Crispy Chicken Caesar Sandwich Recipe- Best Ever
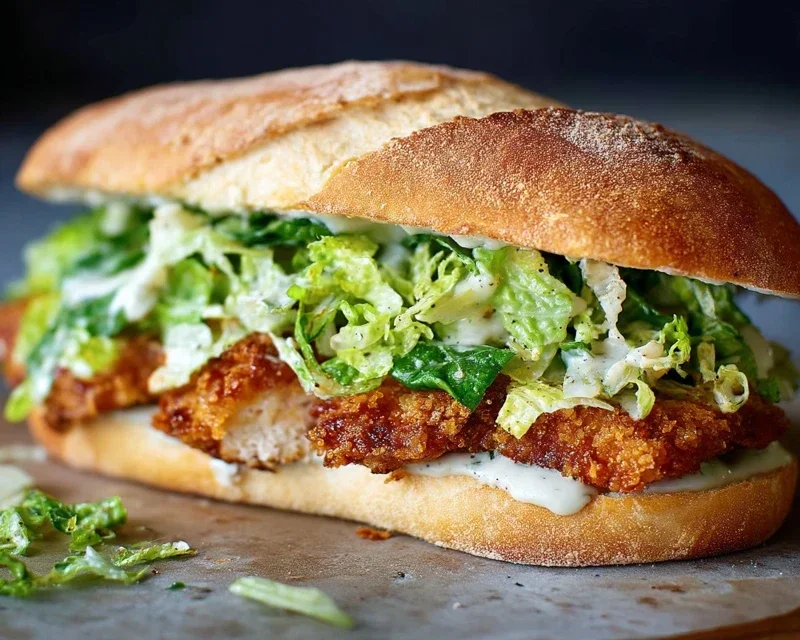
Crispy Chicken Caesar Sandwich. Let’s be honest, there are sandwiches, and then there are sandwiches. And this, my friends, is firmly in the latter category. Forget soggy lettuce and bland chicken; we’re talking about a flavor explosion that takes everything you love about a classic Caesar salad and elevates it to handheld perfection. Why do we adore this magnificent creation? It’s the irresistible combination of textures: the satisfying crunch of perfectly fried chicken, the crisp bite of fresh romaine, the salty tang of Parmesan, and the creamy richness of a homemade Caesar dressing, all nestled between soft, toasted buns. What truly makes this Crispy Chicken Caesar Sandwich special is its comforting familiarity, yet excitingly bold flavor profile. It’s the ultimate weeknight dinner hero or weekend lunch indulgence. Get ready to ditch your boring lunch routine and dive headfirst into this absolute delight!

Crispy Chicken Caesar Sandwich
There are sandwiches, and then there are sandwiches. My Crispy Chicken Caesar Sandwich falls firmly into the latter category. It’s a symphony of textures and flavors: the satisfying crunch of perfectly fried chicken, the creamy tang of a homemade Caesar dressing, and the freshness of crisp lettuce, all piled high on your favorite bun. This isn’t your average lunchbox filler; it’s a flavor explosion that will have you coming back for more. Forget soggy bread and bland chicken – this recipe is all about elevating your sandwich game. We’re talking about a truly indulgent experience that’s surprisingly easy to achieve right in your own kitchen. The secret lies in the quality of the ingredients and a few simple techniques that make all the difference.
Ingredients:
Making the Magic: Caesar Dressing
Let’s start with the heart of any good Caesar: the dressing. Forget the bottled stuff; this homemade version is a game-changer. In a medium bowl, whisk together the mayonnaise, Greek yogurt, Dijon mustard, Worcestershire sauce, and fresh lemon juice. The Greek yogurt adds a lovely tang and helps to lighten the dressing without sacrificing richness. Next, fold in the freshly grated Parmesan cheese. The finer the grate, the better it will incorporate. Now comes the garlic. Mince your garlic cloves as finely as possible, or even consider using a garlic press for the smoothest texture. Add the minced garlic to the dressing, along with a ¼ teaspoon of black pepper and a pinch of sea salt. Give everything a good stir until it’s beautifully combined and creamy. Taste and adjust the seasoning if needed – a little more lemon juice for brightness, or a touch more salt to enhance the flavors. This dressing is also fantastic on salads, as a dip for veggies, or even as a marinade for other proteins. Set this aside to let the flavors meld while you prepare the chicken.
Preparing the Crispy Chicken
Now for the star of the show: the chicken. We’re aiming for golden-brown perfection. Take your chicken cutlets and pound them gently with a meat mallet or the bottom of a heavy pan until they are all about ½ inch thick. This ensures even cooking. Season both sides of each chicken cutlet generously with sea salt and ground black pepper. You want a good coating of flavor right from the start.
In a shallow dish or on a plate, combine the all-purpose flour with ½ teaspoon of salt. This flour mixture will be our crispy coating. Dredge each seasoned chicken cutlet in the seasoned flour, making sure to coat both sides thoroughly. Shake off any excess flour.
Frying to Perfection
It’s time to get that chicken beautifully crispy! Heat a generous amount of oil in a large skillet over medium-high heat. You want enough oil to come about ½ inch up the sides of the pan. To test if the oil is hot enough, drop a tiny pinch of flour into it; if it sizzles immediately, you’re good to go. Carefully place the floured chicken cutlets into the hot oil, being careful not to overcrowd the pan. You may need to fry them in batches. Fry for about 4-5 minutes per side, or until the chicken is golden brown, cooked through, and reaches an internal temperature of 165°F (74°C). The cooking time will vary depending on the thickness of your cutlets. Once cooked, transfer the chicken to a wire rack set over a baking sheet to drain any excess oil. This step is crucial for maintaining that glorious crispiness.
Assembling Your Masterpiece
With your perfectly crispy chicken ready and your delicious Caesar dressing made, it’s time for the grand finnon-alcoholic ale: assembly. Toast your favorite sandwich buns. A lightly toasted bun adds another layer of texture and prevents it from getting soggy. Spread a generous amount of your homemade Caesar dressing on both halves of the toasted bun. Lay a piece of your crispy chicken cutlet on the bottom half. Top the chicken with fresh, crisp lettuce leaves – romaine lettuce is classic for a reason. Add an extra drizzle of Caesar dressing over the lettuce if you’re feeling extra indulgent. Place the top half of the bun on, and marvel at your creation.
Notes:
Conclusion:
There you have it! This Crispy Chicken Caesar Sandwich recipe is an absolute winner, offering that perfect crunch from the fried chicken, the refreshing tang of Caesar dressing, and the satisfying chew of the bun. It’s a fantastic way to elevate a classic salad into a portable, handheld delight that’s perfect for lunch, a casual dinner, or even a picnic. The combination of textures and flavors is truly irresistible, making it a new go-to for me, and I hope it will be for you too!
This sandwich shines on its own, but it also pairs wonderfully with a side of crispy sweet potato fries, a light coleslaw, or a simple green salad. For variations, consider adding a sprinkle of crispy beef bacon bits for extra savory notes, or a layer of thinly sliced red onion for a bit of bite. You could also try a different cheese, like Gruyère, for a nutty twist. I truly encourage you to give this Crispy Chicken Caesar Sandwich a try; it’s remarkably easy to make and the payoff in deliciousness is immense!
Frequently Asked Questions:
Can I make the chicken ahead of time?
Absolutely! You can fry or bake the chicken breasts ahead of time and store them in the refrigerator for up to 2 days. Reheat them gently in a toaster oven or a lightly oiled skillet until warmed through before assembling your sandwich for that perfect crispy texture.
What’s the best way to ensure my chicken is extra crispy?
For maximum crispiness, make sure your oil is at the correct temperature (around 350-375°F or 175-190°C) and don’t overcrowd the pan when frying. For baking, ensure the chicken is not touching and consider using a wire rack over a baking sheet to allow air to circulate, creating an even crisp.
Can I use a different type of bread?
Certainly! While a sturdy brioche or ciabatta bun works wonderfully, feel free to experiment. A toasted sourdough, a hearty whole wheat roll, or even a large lettuce leaf for a low-carb option would be delicious variations.
Crispy Chicken Caesar Sandwich
A delicious sandwich featuring crispy fried chicken cutlets, a creamy homemade Caesar dressing, and fresh Parmesan cheese.
Ingredients
-
½ cup full-fat mayonnaise
-
3 tbsp Greek yogurt
-
1 tsp Dijon mustard
-
1 tsp Worcestershire sauce
-
2 tbsp lemon juice
-
¼ cup Parmesan cheese (freshly grated)
-
1-2 garlic cloves (minced)
-
¼ tsp black pepper
-
Pinch sea salt
-
5 chicken cutlets
-
sea salt (to taste)
-
ground black pepper (to taste)
-
Oil (for frying)
-
⅓ cup all-purpose flour
-
½ tsp salt
Instructions
-
Step 1
In a medium bowl, whisk together the mayonnaise, Greek yogurt, Dijon mustard, Worcestershire sauce, lemon juice, Parmesan cheese, minced garlic, ¼ tsp black pepper, and a pinch of sea salt. Set aside. -
Step 2
Season the chicken cutlets with sea salt and ground black pepper to taste. -
Step 3
In a shallow dish, combine the all-purpose flour, ½ tsp salt, and a pinch of ground black pepper. -
Step 4
Dredge each chicken cutlet in the seasoned flour mixture, ensuring it is evenly coated. Shake off any excess flour. -
Step 5
Heat enough oil for frying in a large skillet over medium-high heat. Carefully place the floured chicken cutlets in the hot oil and fry for about 5-7 minutes per side, or until golden brown and cooked through. -
Step 6
Remove the crispy chicken cutlets from the skillet and place them on a wire rack or paper towels to drain excess oil. -
Step 7
Assemble the sandwiches by placing a crispy chicken cutlet on your desired bread (not included in ingredients) and topping generously with the prepared Caesar dressing.
Important Information
Nutrition Facts (Per Serving)
It is important to consider this information as approximate and not to use it as definitive health advice.
Allergy Information
Please check ingredients for potential allergens and consult a health professional if in doubt.