Easy St. Patrick’s Day Cookies-Quick & Festive Treats
Easy St. Patrick’s Day Cookies are the perfect way to add a touch of festive fun to your celebration without any fuss! As the Emerald Isle calls and leprechauns are said to be on the loose, what better way to embrace the spirit of St. Paddy’s Day than with a batch of these delightful treats? These aren’t just any cookies; they’re little bites of happiness, designed to be incredibly simple to make, even for the most novice baker. We all love a good cookie, but these easy St. Patrick’s Day cookies hold a special charm. They’re wonderfully adaptable, allowing you to personalize them with your favorite green hues and fun sprinkles. Whether you’re hosting a party, packing a lunchbox, or just craving a sweet treat, these cookies deliver on flavor and festive cheer. They’re incredibly satisfying to whip up, leaving you more time to enjoy the festivities and perhaps even hunt for that pot of gold!

Easy St. Patrick’s Day Cookies
Looking for a simple and utterly delightful way to add some festive cheer to your St. Patrick’s Day celebrations? These easy St. Patrick’s Day cookies are the answer! They are so incredibly simple to make that even baking novices can whip up a batch, and they’re guaranteed to bring a smile to everyone’s face. The vibrant green color screams St. Paddy’s Day, and the hint of sweetness from the simple glaze is just perfect. No fancy decorating skills are required here – just a love for all things green and delicious. These cookies are a fantastic activity to do with kids, turning your kitchen into a hub of St. Patrick’s Day magic. Imagin extracte the fun of rolling the dough, the anticnon-alcoholic ipation of baking, and finally, the joy of decorating these cheerful treats.
What makes these cookies truly special is their adaptability. While we’re going for a classic green hue, you could certainly play with other colors if you wished, or even add a touch of sparkle with some edible glitter. The base recipe is so forgiving, making it ideal for a stress-free baking experience. Forget about complicated chilling times or precise dough handling. These cookies come together in a flash, leaving you more time to enjoy the festivities and less time stuck in the kitchen. They are perfect for a classroom party, a get-together with friends, or simply as a sweet treat to brighten your own day. So, grab your apron, and let’s get baking some luck!
Ingredients:
Instructions:
Preparing the Cookie Dough:
Begin extract by preheating your oven to 350°F (175°C). While the oven heats up, you’ll want to prepare your baking sheets. Line them with parchment paper to ensure your beautiful green cookies don’t stick and to make cleanup a breeze. In a large mixing bowl, combine the contents of your white cake mix box. This is the magical base for our cookies! Next, add the two large eggs and the 1/3 cup of vegetable oil. Now comes the fun part – adding the color! Squeeze in the 1/4 teaspoon of Kelly green gel food coloring. Gel food coloring is fantastic because it’s highly concentrated, meaning you get a vibrant color without adding too much liquid, which could affect the cookie’s texture. Start with the suggested amount and then, if you desire an even more intense green, you can add another tiny drop or two, mixing thoroughly after each addition until you achieve your perfect St. Patrick’s Day green.
Mixing and Forming the Dough:
Using a sturdy spoon or an electric mixer on low speed, combine all the ingredients until they are just mixed. Be careful not to overmix at this stage; overmixing can lead to tougher cookies. You want a soft, pliable dough that is easy to handle. The dough should be a beautiful, uniform green color. Once mixed, you can either drop rounded tablespoons of dough onto your prepared baking sheets, leaving about 2 inches between them to allow for spreading, or, for slightly more uniform cookies, you can roll the dough into small balls. If you choose to roll them, gently roll about 1 tablespoon of dough between your palms to form a smooth ball. Placing the dough balls about 2 inches apart on the baking sheets will give them enough space to spread out as they bake without touching each other.
Baking the Green Goodies:
Place your baking sheets into the preheated oven. Bake for approximately 9-12 minutes. The exact baking time will depend on your oven and the size of your cookies. You’ll know they’re ready when the edges are lightly golden and the centers look set. They shouldn’t be browned all the way through, as they will continue to cook slightly on the hot baking sheet after you remove them from the oven. It’s always a good idea to check on them around the 9-minute mark to avoid overbaking. For a softer cookie, err on the side of less time. Once baked, carefully remove the baking sheets from the oven.
Cooling and Preparing the Glaze:
Allow the cookies to cool on the baking sheets for about 5 minutes. This initial cooling period on the sheet helps them firm up enough to be moved without falling apart. After 5 minutes, transfer the cookies to a wire rack to cool completely. It’s crucial that they are completely cool before you add the glaze, otherwise, the glaze will melt right off! While the cookies are cooling, you can prepare your simple and sweet glaze. In a small bowl, whisk together the 3 tablespoons of granulated sugar and the 6 tablespoons of powdered sugar. Gradually add a very small amount of liquid, starting with just a teaspoon of milk or water at a time, whisking continuously, until you reach a smooth, pourable consistency. You want the glaze to be thick enough to coat the cookies without being so thin that it runs off entirely. If it’s too thick, add a tiny bit more liquid; if it’s too thin, add a little more powdered sugar.
Glazing and Finishing Touches:
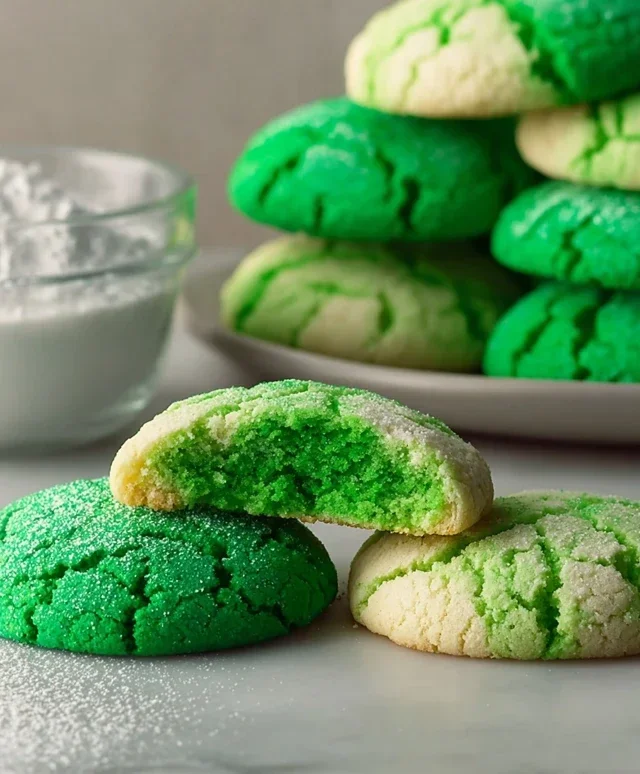
Once the cookies are completely cool, it’s time for the final festive touch – the glaze! You can dip the tops of the cookies into the glaze, or for more control and a slightly thinner coating, you can spoon the glaze over the tops of each cookie. For an extra festive flair, you can add green sprinkles or even a touch of edible glitter onto the wet glaze before it sets. This is where you can really let your creativity shine! If you want a more marbled effect, you can even divide the glaze and color a small portion with another drop of green food coloring for a deeper hue, and then swirl it gently into the lighter glaze before applying it to the cookies. Let the glazed cookies sit on the wire rack until the glaze has set completely. This can take anywhere from 30 minutes to an hour, depending on the thickness of your glaze and the humidity. Once the glaze is set, your delightful Easy St. Patrick’s Day Cookies are ready to be enjoyed! They store well in an airtight container at room temperature for up to 3-4 days.
Conclusion:
There you have it – a simple yet incredibly festive way to celebrate St. Patrick’s Day with these Easy St. Patrick’s Day Cookies! What makes this recipe so fantastic is its no-fuss approach. We’ve focused on minimal ingredients and straightforward steps, ensuring that even begin extractner bakers can achieve delicious and visually appealing results. These cookies are not only a joy to make but also a delightful treat that will impress your friends and family. They’re the perfect balance of sweet and buttery, making them an instant hit for any St. Paddy’s Day gathering.
To serve, consider presenting them on a green platter for an extra festive touch. They pair wonderfully with a glass of cold milk or a warm cup of tea. For variations, don’t be afraid to get creative! You can easily switch up the sprinkles to include gold coins or sbeef hamrocks for added holiday spirit. Consider adding a hint of peppermint extract to the dough for a refreshing twist, or a touch of green food coloring for vibrant cookies. The possibilities are truly endless!
I highly encourage you to give this recipe a try. It’s a wonderful way to spread some cheer and add a homemade touch to your St. Patrick’s Day festivities. Let’s get baking!
Frequently Asked Questions:
Can I make these cookies ahead of time?
Absolutely! These cookies store very well. Once completely cooled, you can store them in an airtight container at room temperature for up to 3-4 days. This makes them perfect for prepping a day or two in advance for your St. Patrick’s Day party.
What’s the best way to get the green color vibrant?
For the most vibrant green color, I recommend using gel food coloring rather than liquid. Gel colors are more concentrated, so you’ll need less to achieve a rich hue. Start with a small amount and gradually add more until you reach your desired shade.
Are there any gluten-free or vegan options?
Yes! For a gluten-free version, you can substitute a good quality gluten-free all-purpose flour blend. For a vegan option, replace the butter with a vegan butter substitute and use an egg replacer (like flax egg or commercial egg replacer) instead of eggs. The texture might be slightly different, but they will still be delicious!
Easy St. Patrick’s Day Cookies
Simple and festive green cookies perfect for St. Patrick’s Day celebrations.
Ingredients
-
1 box (15.25 oz) white cake mix (about 3 cups)
-
2 large eggs
-
1/3 cup vegetable oil
-
1/4 teaspoon Kelly green gel food coloring
-
3 tablespoons granulated sugar
-
6 tablespoons powdered sugar
Instructions
-
Step 1
Preheat oven to 350°F (175°C). Line baking sheets with parchment paper. -
Step 2
In a large bowl, combine the white cake mix, eggs, and vegetable oil. Mix until well combined and a dough forms. -
Step 3
Add the Kelly green gel food coloring to the dough and mix until evenly distributed. -
Step 4
Roll dough into 1-inch balls. In a small bowl, combine granulated sugar. Roll each dough ball in granulated sugar. -
Step 5
Place balls 2 inches apart on prepared baking sheets. Gently flatten each cookie with the bottom of a glass. -
Step 6
Bake for 10-12 minutes, or until edges are lightly golden. -
Step 7
Let cookies cool on the baking sheets for 2 minutes before transferring to a wire rack to cool completely. Once cool, dust with powdered sugar.
Important Information
Nutrition Facts (Per Serving)
It is important to consider this information as approximate and not to use it as definitive health advice.
Allergy Information
Please check ingredients for potential allergens and consult a health professional if in doubt.