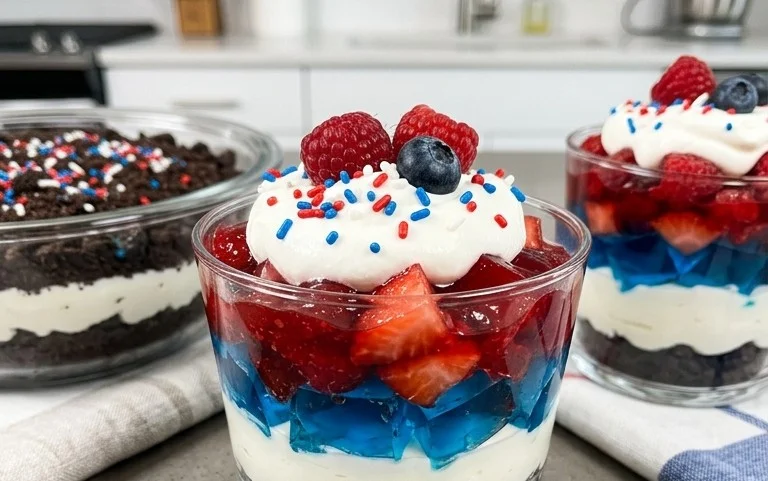
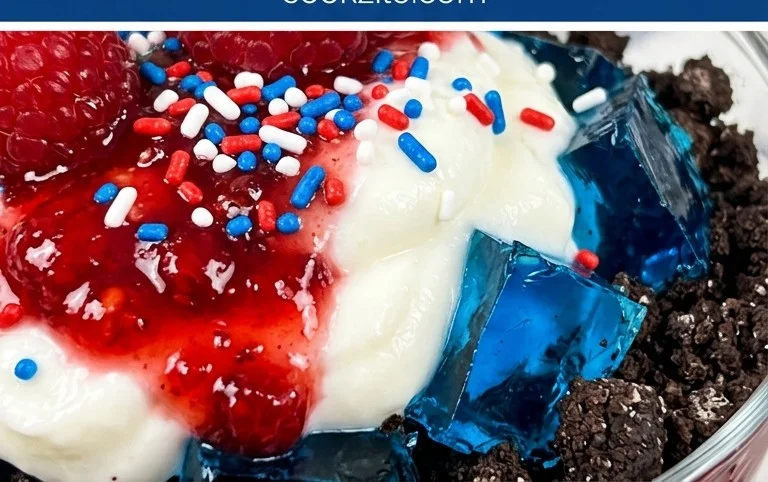
Red White and Blue Dirt Cups- Easy Fun Dessert
Red, White and Blue Dirt Cups are more than just a dessert; they’re a nostalgic trip down memory lane, a burst of patriotic fun, and a guaranteed crowd-pleaser. Who doesn’t love diggin extractg into a cup of chocolatey “dirt” topped with sweet, creamy layers? These delightful concoctions capture the spirit of summer holidays and backyard barbecues with their vibrant colors and playful presentation. What truly makes these Red, White and Blue Dirt Cups so special is their effortless charm and customizable nature. They’re incredibly easy to assemble, making them perfect for little hands to help with, and they always bring smiles to faces of all ages. Whether you’re celebrating the Fourth of July, a birthday, or just craving a treat that’s as fun to make as it is to eat, these layered delights are the perfect choice. Get ready to create a dessert that’s as visually stunning as it is delicious!
Red, White and Blue Dirt Cups
Get ready for a patriotic dessert that’s as fun to make as it is to eat! These Red, White and Blue Dirt Cups are a delightful twist on the classic dirt cup, perfect for Fourth of July parties, summer cookouts, or any occasion that calls for a festive and delicious treat. The vibrant layers of red, white, and blue chocolate pudding, mixed with crushed Oreos, create a visually stunning and incredibly tasty dessert that will have everyone asking for the recipe. They’re surprisingly simple to assemble, making them a fantastic activity to do with kids, and the individual servings are perfect for easy distribution at any gathering. Let’s dive in and create some edible art!
Ingredients:
Preparing the Pudding Layers
The foundation of our delicious dirt cups lies in the creamy, flavorful pudding. We’ll be making three distinct colors to achieve that iconic red, white, and blue effect. It’s important to use gel food coloring for the most vibrant and concentrated colors without diluting the pudding’s texture.
Step-by-Step Instructions
1. Prepare the White Pudding Base: In a medium-sized bowl, whisk together the contents of one box of cheesecake pudding mix with 2 cups of milk. Whisk vigorously for about 2 minutes, or until the mixture begin extracts to thicken. Allow this white pudding to set in the refrigerator for at least 5 minutes. This initial chilling will help it firm up before we start layering. For an even firmer pudding, you can let it sit a bit longer, but be sure to give it another quick whisk before proceeding if it thickens too much. This white layer will form the central “white” part of our patriotic design.
2. Create the Red Pudding Layer: In a separate bowl, combine the contents of the second box of cheesecake pudding mix with the remaining 2 cups of milk. Whisk this mixture for about 2 minutes until it starts to thicken. Now, it’s time for the color! Carefully add the ¼ teaspoon of red gel food dye to this pudding mixture. Mix thoroughly until you achieve a uniform and vibrant red hue. If you desire a deeper red, you can add another tiny drop of gel food coloring, but be cautious not to overdo it, as a little goes a long way with gel dyes. Once the color is to your liking, let this red pudding sit for about 5 minutes to begin extract setting, similar to the white layer.
3. Color the Blue Pudding Layer: To create our blue pudding, we’ll use the white pudding we prepared earlier. Take about half of the thickened white pudding and place it into a third bowl. Now, add the ¼ teaspoon of blue gel food dye to this portion of white pudding. Stir well until the blue color is evenly distributed and the pudding is a beautiful shade of blue. Again, adjust the color intensity by adding a tiny bit more gel dye if needed, but always err on the side of caution. This blue pudding will be our top layer, representing the blue in our flag.
4. Assemble the Dirt Cups: Now for the fun part – building our dirt cups! Grab your clear serving cups or jars. We want to create distinct layers. Start by spooning a layer of crushed Oreo cookies into the bottom of each cup. This forms the “dirt.” Next, add a layer of the red pudding over the crushed Oreos. You can use a spoon or a piping bag for a neater application. Follow the red layer with a generous dollop of the white pudding, spreading it evenly to create a clear white stripe. Finally, top everything off with the blue pudding layer. You can gently spread it or pipe it for a cleaner finish. The clear cups will showcase these beautiful, patriotic layers perfectly.
5. Add the Final Touches: Once all your pudding layers are in place, it’s time to add the finishing details. Sprinkle a little more crushed Oreo cookie mixture over the top of the blue pudding to enhance the “dirt” effect. This not only looks great but also adds a lovely texture contrast. Now, for the best part – the gummy worms! Carefully insert the red and blue gummy worms into the pudding, letting them peek out as if they are emergin extractg from the dirt. You can position them to look playful and fun. Place your finished dirt cups in the refrigerator for at least 30 minutes to allow them to chill and set completely before serving. This ensures that the layers are firm and the flavors have melded together beautifully. Enjoy your festive and delicious Red, White and Blue Dirt Cups!
Conclusion:
There you have it! Our Red, White and Blue Dirt Cups are the perfect, no-bake treat to celebrate any occasion, especially patriotic holidays. They’re incredibly easy to assemble, making them a fantastic activity to do with kids or to whip up quickly when you need a crowd-pleasing dessert. The delightful combination of creamy pudding, crunchy cookie crum extractbles, and sweet gummy worms always brings smiles. I truly hope you give this recipe a try!
These dirt cups are wonderfully versatile. Serve them up in individual clear plastic cups or small mason jars for a charming presentation. For a larger gathering, you could even layer them in a trifle dish. If you’re looking to switch things up, consider adding a layer of fresh berries between the pudding and cookie crum extractbs for extra freshness and color. Another fun variation is to use chocolate pudding with white chocolate chips mixed in, or even a swirl of strawberry jam for an added fruity punch. Don’t be afraid to experiment and make these Red, White and Blue Dirt Cups your own!
Frequently Asked Questions:
Can I make these ahead of time?
Absolutely! These are perfect for making ahead. I usually assemble them the day before and store them in the refrigerator. Just make sure to add the gummy worms and any final cookie crum extractb topping right before serving to keep them looking their best and prevent the worms from getting too soft.
What kind of pudding works best?
The classic choice is chocolate pudding, but feel free to get creative! Vanilla pudding tinted with red and blue food coloring works beautifully for the patriotic theme. You could even try a mix of chocolate and vanilla for a layered effect. Instant pudding is incredibly convenient, but you can also use homemade pudding if you prefer.
Are there any nut-free alternatives?
Yes! The key is to ensure your chocolate sandwich cookies and any toppings are nut-free. Many brands offer nut-free options. For the gummy worms, most are nut-free, but it’s always a good idea to check the packagin extractg to be absolutely sure for any allergies.
Red, White and Blue Dirt Cups
A festive and fun dessert featuring layers of creamy cheesecake pudding, crushed Oreos, and patriotic gummy worms.
Ingredients
-
2 boxes cheesecake pudding (3.4 ounces each)
-
4 cups milk
-
19 Oreo cookies (crushed)
-
¼ teaspoon red gel food dye
-
¼ teaspoon blue gel food dye
-
8 red and blue gummy worms
Instructions
-
Step 1
In a large bowl, whisk together the cheesecake pudding mix and milk until well combined and slightly thickened. Let stand for 5 minutes. -
Step 2
Divide the pudding mixture into three equal portions in separate bowls. -
Step 3
Add ¼ teaspoon of red gel food dye to one portion of pudding and stir until evenly colored. Repeat with the blue gel food dye for the second portion. -
Step 4
In the bottom of 8 small cups or jars, spoon a layer of crushed Oreo cookies. This will be your “dirt.” -
Step 5
Spoon alternating layers of the red pudding, white pudding (plain cheesecake pudding), and blue pudding over the crushed Oreos in each cup. -
Step 6
Top each dirt cup with a few more crushed Oreo cookies and place 1 red and blue gummy worm sticking out of the “dirt.” -
Step 7
Chill for at least 30 minutes before serving to allow the pudding to set.
Important Information
Nutrition Facts (Per Serving)
It is important to consider this information as approximate and not to use it as definitive health advice.
Allergy Information
Please check ingredients for potential allergens and consult a health professional if in doubt.