Classic Italian Tiramisu Recipe-The Best Dessert Ever
BEST Classic Italian Tiramisu Recipe is more than just a dessert; it’s an experience. This beloved Italian masterpiece, translating to “pick me up,” has captured hearts and taste buds across the globe for good reason. Its magical alchemy of textures and flavors is simply irresistible. Imagin extracte the delicate sweetness of mascarpone cheese, the satisfying soak of coffee-infused ladyfingers, and the gentle dusting of cocoa creating a symphony on your palate. What makes this BEST Classic Italian Tiramisu Recipe so special is its inherent elegance and the comforting familiarity it brings. It’s a dessert that feels both luxurious and approachable, perfect for celebrations or simply a moment of pure, unadulterated joy. We’ll guide you through creating this iconic treat, ensuring your tiramisu is as authentic and delicious as it is beautiful.
BEST Classic Italian Tiramisu Recipe
Ah, Tiramisu! The very name evokes images of rich, creamy indulgence and delicate coffee-soaked ladyfingers. For me, a truly classic Tiramisu is a celebration of simple, high-quality ingredients coming together in perfect harmony. It’s a dessert that feels both elegant and incredibly comforting, and I’m thrilled to share my go-to recipe with you. This isn’t just any Tiramisu; it’s the kind of Tiramisu that transports you straight to Italy with every spoonful. We’ll be using a few key components that make all the difference: luxurious mascarpone, fresh egg yolks for richness, and of course, strong coffee and a dusting of cocoa. Let’s get started on creating this masterpiece!
Ingredients:
Crafting the Luscious Cream
The heart of any great Tiramisu is its incredibly smooth and rich cream. This is where we’ll combine the mascarpone with our egg yolk mixture. It’s crucial to have your mascarpone nice and cold, as this helps it maintain its structure and prevents it from becoming too runny.
1. Prepare the Egg Yolk Base: In a medium heatproof bowl (make sure it fits snugly over a saucepan without touching the water), whisk together the 4 egg yolks, 1/3 cup of the granulated sugar, the vanilla extract, and the salt. We’re going to gently cook this mixture over a double boiler. Fill a saucepan with about an inch of water and bring it to a simmer over medium-low heat. Place the bowl with the egg yolk mixture over the simmering water. Continuously whisk the egg yolk mixture for about 8-10 minutes. You’ll notice it will start to thicken and become pnon-alcoholic ale yellow. The goal here is to cook the egg yolks safely and to dissolve the sugar completely, creating a sabayon-like base. It should coat the back of a spoon. Once it reaches this consistency, remove the bowl from the heat and let it cool slightly.
2. Whip the Mascarpone: While the egg yolk mixture is cooling, take your cold mascarpone cheese and place it in a separate large bowl. Using an electric mixer on low speed, gently beat the mascarpone for about 30 seconds until it’s smooth and creamy. Be careful not to overmix at this stage, as mascarpone can become grainy if overworked.
3. Combine for Creaminess: Once the egg yolk mixture has cooled to lukewarm (this is important to prevent the mascarpone from melting), gradually add the egg yolk mixture to the bowl with the mascarpone. Continue to mix on low speed until everything is just combined and you have a beautifully smooth, rich cream. This is the foundation of our Tiramisu, and it should be absolutely luxurious.
4. Lighten the Cream (with Heavy Cream Option): If you’re using heavy cream, pour the chilled heavy cream into a separate, clean bowl. Add the remaining 1/3 cup of granulated sugar. Using an electric mixer fitted with the whisk attachment, beat the heavy cream on medium-high speed until stiff peaks form. This means when you lift the whisk, the cream holds its shape and doesn’t droop. Be careful not to overbeat, or you’ll end up with butter! Gently fold the whipped cream into the mascarpone and egg yolk mixture in two additions. Use a spatula and a gentle folding motion to incorporate the cream without deflating it. You want to maintain that airy lightness.
Lighten the Cream (with Egg Whites Option): If you’re opting for the egg white version, clean your whisk attachment thoroughly. In a very clean bowl, add the 4 egg whites and the 1/4 tsp salt. Beat on medium-high speed until soft peaks form. Gradually add the remaining 1/3 cup of granulated sugar, a tablespoon at a time, beating well after each addition until stiff, glossy peaks form. This is essentially a meringue. Gently fold this meringue into the mascarpone and egg yolk mixture in two additions, just as you would with the whipped cream, ensuring a light and airy texture.
Assembling Your Tiramisu Masterpiece
Now comes the fun part – assembling our Tiramisu! This is where all the individual elements come together to create that iconic dessert.
5. Dip and Layer: Pour your room temperature strong black coffee into a shallow dish. This is the perfect temperature – too hot and it will make the ladyfingers disintegrate; too cold and it won’t absorb as well. Working one at a time, quickly dip each ladyfinger into the coffee. You want to dip them just enough to moisten them on both sides, but not so long that they become soggy and break apart. A quick dunk is all it takes – think 1-2 seconds per side. Arrange the dipped ladyfingers in a single layer at the bottom of your serving dish (a 9×13 inch or similar rectangular dish works beautifully). You might need to break some ladyfingers to fit the entire base.
6. First Cream Layer: Once the first layer of ladyfingers is in place, gently spread half of your prepared mascarpone cream evenly over the top. Use the back of a spoon or an offset spatula to create a smooth, even surface. This creamy layer is what will soften and bind the ladyfingers.
7. Second Ladyfinger Layer: Repeat the dipping process with the remaining ladyfingers and arrange them in a second layer on top of the cream. Again, aim for a single, even layer.
8. Final Cream Layer: Spread the remaining mascarpone cream evenly over the second layer of ladyfingers, ensuring the entire surface is covered. Smooth the top as much as possible.
The Final Flourish
The last step before chilling is that signature dusting of cocoa. It not only adds a beautiful finish but also a slight bitter contrast to the sweetness of the cream.
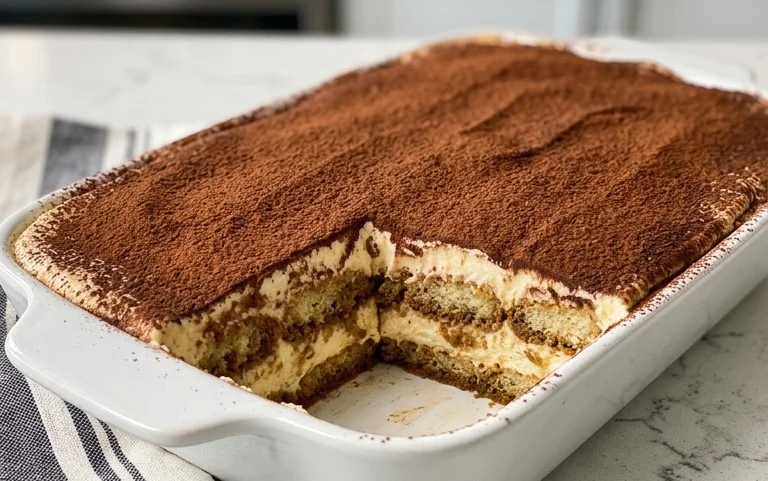
9. Dust with Cocoa: Just before serving (or when you’re ready to chill), generously dust the top of the Tiramisu with the unsweetened cocoa powder. I like to use a fine-mesh sieve for an even, professional-looking finish. This is the final touch that makes it instantly recognizable as Tiramisu.
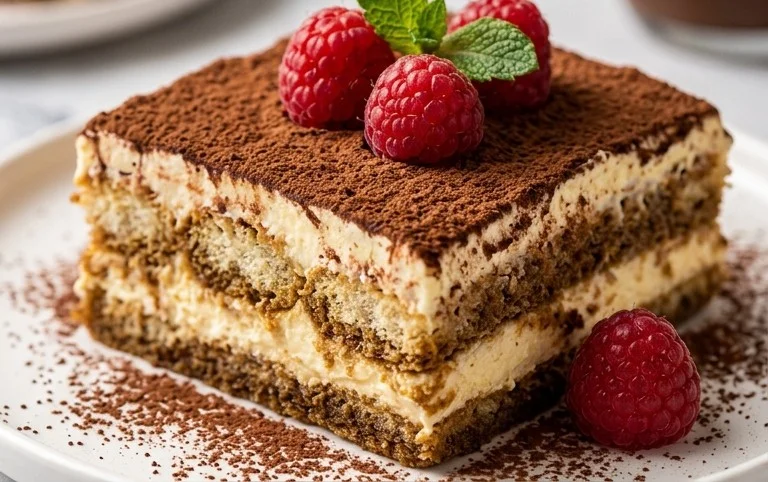
10. Chill and Serve: Cover the serving dish tightly with plastic wrap. Refrigerate for at least 4-6 hours, or preferably overnight. This chilling time is crucial for the flavors to meld together and for the Tiramisu to set properly, making it easy to slice and serve. When ready to serve, cut into squares and enjoy the decadent layers of coffee-soaked ladyfingers and luscious, creamy mascarpone. Buon appetito!
Conclusion:
There you have it – our meticulously crafted recipe for the BEST Classic Italian Tiramisu! We’ve poured our hearts into ensuring this recipe delivers that authentic, creamy, and deeply satisfying experience you crave. The magic lies in the simplicity of quality ingredients: rich mascarpone, potent espresso, delicate ladyfingers, and a whisper of cocoa. It’s a dessert that truly embodies comfort and elegance, perfect for impressing guests or simply indulgin extractg yourself. Serve it chilled, perhaps with a dusting of extra cocoa and a strong shot of espresso on the side for true connoisseurs. For those seeking a twist, consider adding a splash of Marsala grape juice or a hint of almond extract to the coffee soak, or even a sprinkle of dark chocolate shavings on top. Don’t be intimidated by its sophisticated reputation; this recipe is approachable and incredibly rewarding. We encourage you to gather your ingredients and experience the joy of creating this iconic Italian masterpiece in your own kitchen. It’s a dessert worth savoring, bite after delightful bite.
Frequently Asked Questions:
Can I make this tiramisu ahead of time?
Absolutely! Tiramisu actually benefits from chilling. It allows the flavors to meld beautifully and the ladyfingers to soften perfectly. I recommend making it at least 4-6 hours in advance, or even the day before, for the best texture and taste.
What’s the best way to store leftover tiramisu?
Store any leftover tiramisu in an airtight container in the refrigerator. It will keep well for about 2-3 days. The cocoa dusting on top might become slightly less pronounced over time, but the flavor will remain delicious.
Can I use regular coffee instead of espresso?
While espresso provides that characteristic depth of flavor and intensity, you can certainly use strongly brewed coffee if espresso isn’t readily available. Just ensure it’s cooled completely before dipping the ladyfingers.
BEST Classic Italian Tiramisu Recipe
A foolproof and classic Italian Tiramisu recipe, rich with mascarpone, coffee, and cocoa.
Ingredients
-
16 oz Mascarpone cheese, cold
-
4 egg yolks
-
2/3 cup granulated sugar
-
1 tsp vanilla extract
-
1/4 tsp salt
-
1 1/2 cup heavy cream, chilled
-
30-36 ladyfingers
-
1 1/2 cup strong black coffee, room temperature
-
2 tbsp cocoa powder
Instructions
-
Step 1
In a large bowl, whisk together the egg yolks and granulated sugar until pale and thick. Stir in the vanilla extract and salt. -
Step 2
In a separate bowl, whip the heavy cream until stiff peaks form. Gently fold the whipped cream into the egg yolk mixture until well combined. -
Step 3
Quickly dip each ladyfinger into the room temperature coffee, ensuring they are moistened but not soggy. Arrange a single layer of dipped ladyfingers in the bottom of a serving dish. -
Step 4
Spread half of the mascarpone cream mixture evenly over the ladyfinger layer. -
Step 5
Repeat with another layer of coffee-dipped ladyfingers, followed by the remaining mascarpone cream mixture. -
Step 6
Cover the dish and refrigerate for at least 4 hours, or preferably overnight, to allow the flavors to meld and the tiramisu to set. -
Step 7
Just before serving, dust the top generously with cocoa powder.
Important Information
Nutrition Facts (Per Serving)
It is important to consider this information as approximate and not to use it as definitive health advice.
Allergy Information
Please check ingredients for potential allergens and consult a health professional if in doubt.