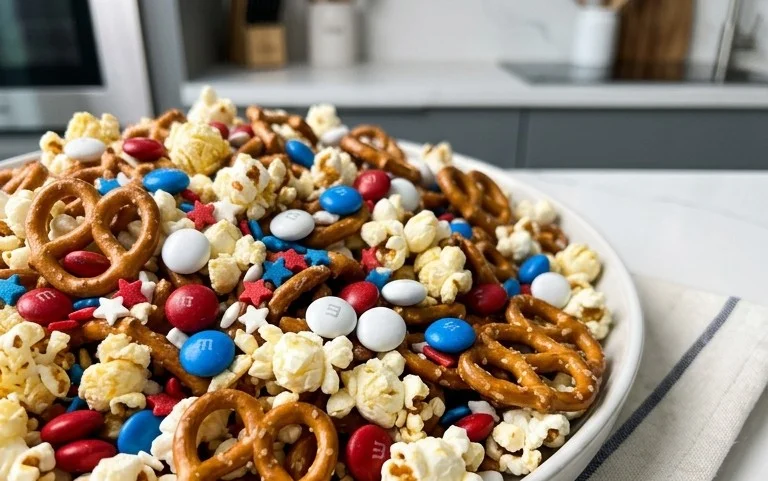
Red White Blue 4th of July Snack Mix Recipe
4th of July Snack Mix is the ultimate crowd-pleaser, and for good reason! As the sparks fly and the summer air buzzes with excitement, we all crave those perfect, no-fuss treats that keep the good times rolling. This isn’t just any snack; it’s a symphony of textures and flavors, a delightful explosion of salty, sweet, and a touch of savory that’s simply irresistible. Imagin extracte a vibrant bowl, overflowing with crunchy pretzels, sweet candies, and savory nuts, all tossed together to create a harmonious bite. It’s the kind of snack that disappears faster than fireworks on a clear night, making it a staple at every barbecue, picnic, and backyard celebration. What makes this 4th of July Snack Mix so special is its incredible versatility – you can customize it to your heart’s content, ensuring there’s a little something for everyone to love.
Get Ready for the Best 4th of July Snack Mix Ever!
Ingredients:
Getting Started: The Foundation of Flavor
This 4th of July Snack Mix is an absolute crowd-pleaser, perfect for barbecues, fireworks viewing parties, or just a festive afternoon treat. It’s incredibly easy to make and the combination of sweet, salty, and crunchy textures is simply irresistible. We’re aiming for a festive, patriotic vibe without sacrificing flavor. The beauty of this recipe lies in its simplicity and the adaptability of its ingredients. Feel free to adjust the quantities of certain items based on your personal preferences – more pretzels for the salty lovers, more M&M’s for the sweet tooths!
The Ultimate 4th of July Snack Mix: A Patriotic Crunch
Let’s dive into creating this delightful treat! The goal here is to create a delicious and visually appealing snack mix that screams “Happy 4th of July!” We’ll be using a combination of cereals, pretzels, and colorful candies, all brought together with a luscious white chocolate coating. This recipe is perfect for making ahead of time, which is a huge bonus when you’re busy preparing for holiday festivities. The ingredients are readily available, and the process is straightforward, making it accessible for bakers of all skill levels.
Step 1: Preparing Your Base
The first crucial step is to gather all of your dry ingredients and combine them in a large mixing bowl. This is where the foundation of our snack mix is laid. Gently pour in the Chex cereal (whether you choose corn or rice, or a delightful mix of both, it’s your call!), the mini pretzel twists (or your broken pretzel rods), the plain Cap’n Crunch cereal, and the Honey Nut Cheerios. Give these dry ingredients a gentle toss with a spatula or your hands to ensure they are relatively evenly distributed. We want a good mix of all the cereals and pretzels in every bite! Avoid overmixing at this stage, as we don’t want to crush the cereals too much.
Step 2: Melting the White Chocolate Magic
Now comes the sweet part – melting the white chocolate. In a separate microwave-safe bowl, combine the white chocolate chips and the coconut oil (or vegetable oil). The oil is key here; it helps the chocolate melt smoothly and become more fluid, ensuring an even coating for our snack mix. Microwave the chips in 30-second intervals, stirring thoroughly after each interval. It’s crucial to stir well between each heating period because white chocolate can seize up and become clumpy if overheated or if not stirred sufficiently. Continue this process until the chocolate is completely melted and smooth, with no lumps remaining. This might take a couple of rounds, so be patient!
Step 3: Coating the Goodness
Once your white chocolate is beautifully melted and smooth, it’s time to coat the dry ingredients. Pour the melted white chocolate over the cereal and pretzel mixture in the large bowl. Using a large spatula or spoon, gently fold the ingredients together until everything is evenly coated in the luscious white chocolate. This step requires a bit of finesse. You want to ensure every piece of cereal and pretzel is kissed by the chocolate without breaking them. Take your time and scrape the sides and bottom of the bowl to incorporate all the dry bits. The goal is a glorious, chocolate-covered mountain of deliciousness.
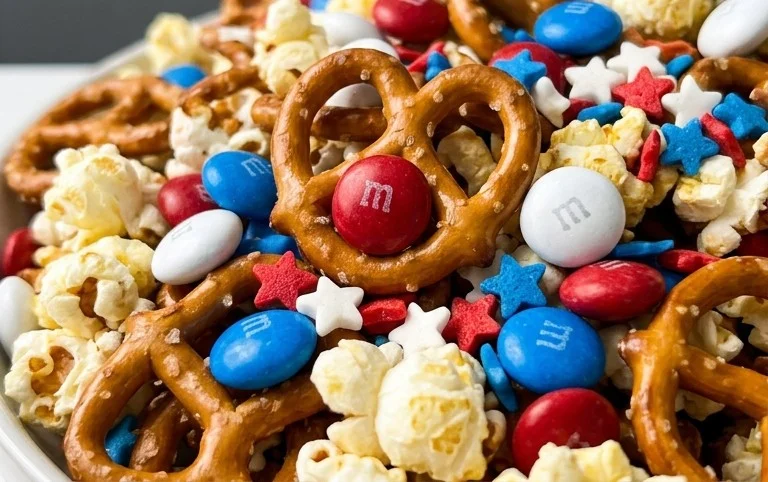
Step 4: Adding the Patriotic Sparkle
Now for the fun and festive part – adding the color! Gently stir in the red, white, and blue M&M’s. If you’re using regular M&M’s and want to enhance the patriotic theme, you can add more red and blue ones at this stage. Imagin extracte the pops of color that will emerge as you mix! This is also the time to add your festive sprinkles, if you’re using them. Sprinkle them over the mix and gently fold them in. These additions not only enhance the visual appeal of your snack mix, making it perfectly suited for the 4th of July, but they also add extra bursts of flavor and texture.
Step 5: Spreading and Setting the Stage for Deliciousness
The final step is to spread the coated snack mix onto a baking sheet lined with parchment paper or wax paper. This makes for easy cleanup and prevents the mix from sticking. Spread it out in a single layer as much as possible. This helps it set evenly and prevents clumps from forming. You can break apart any larger clusters with your spatula if you prefer smaller, more manageable pieces. Let the snack mix sit at room temperature for at least 1-2 hours, or until the white chocolate has completely hardened. For a quicker set, you can place it in the refrigerator for about 30-45 minutes. Once it’s firm, you can break it into desired pieces.
Note 1: M&M’s Customization
The beauty of this recipe is its adaptability. If you can’t find red, white, and blue M&M’s, don’t fret! Grab your favorite color M&M’s and supplement with extra red and blue ones from a separate bag if you want to enhance the patriotic theme. You could even use just plain chocolate M&M’s if that’s what you have, or add other candies like Skittles for extra color. The key is to have fun and tailor it to your taste. The amount of M&M’s is entirely up to you; some people like a lot, some prefer just a hint of them.
Note 2: Sprinkles for Extra Flair
Festive sprinkles are a wonderful optional addition that can take your 4th of July Snack Mix to the next level. Look for star-shaped sprinkles, red, white, and blue jimmies, or any other patriotic-themed sprinkles you can find. They add a delightful visual element and a subtle extra crunch. Don’t go overboard, as you don’t want to overpower the other flavors, but a light dusting will make your snack mix truly festive and celebratory.
Conclusion:
This 4th of July Snack Mix is an absolute winner for any celebration! Its delightful combination of sweet, salty, and crunchy textures makes it incredibly moreish, ensuring it disappears fast. It’s a crowd-pleaser that’s both easy to make and endlessly adaptable, perfect for setting out at barbecues, picnics, or just enjoying during fireworks. The beauty of this mix lies in its simplicity and how it brings together familiar flavors in a festive way. I encourage you to whip up a batch for your own Independence Day festivities; you won’t regret it!
Serving this versatile snack mix is a breeze. Pile it high in a festive bowl on your dessert table, or portion it into individual bags for easy grab-and-go enjoyment. It pairs wonderfully with cool drinks like lemonade or iced tea. For variations, consider adding a sprinkle of chili powder for a touch of heat, or incorporating some dried cranberries for extra chegrape juicess and a pop of color. Don’t be afraid to get creative and make this 4th of July Snack Mix your own!
Frequently Asked Questions:
Can I make this snack mix ahead of time?
Absolutely! This 4th of July Snack Mix is perfect for making a day or two in advance. Store it in an airtight container at room temperature to keep it fresh and crunchy until you’re ready to serve.
What are some other ingredient ideas for this mix?
You can customize this mix extensively! Try adding pretzel sticks, cheese crackers, popcorn, mini marshmallows, or even some chocolate chips for a sweet kick. Nuts like peanuts, almonds, or cashews are also fantastic additions.
How should I store any leftover snack mix?
Leftovers can be stored in an airtight container or a resealable bag at room temperature. Properly stored, it should remain delicious for several days, though I doubt you’ll have any left!
4th of July Snack Mix
A festive and easy-to-make snack mix perfect for Fourth of July celebrations, featuring a blend of cereals, pretzels, M&M’s, and white chocolate.
Ingredients
-
2 cups Chex cereal (corn or rice)
-
1 cup mini pretzel twists
-
2 cups Cap’n Crunch cereal (without berries)
-
2 cups Honey Nut Cheerios cereal
-
1 cup red, white, and blue M&M’s
-
1-1/2 bags (16 ounces total) white chocolate chips
-
1-1/2 teaspoons coconut oil
-
2 tablespoons festive sprinkles
Instructions
-
Step 1
In a very large bowl, combine the Chex cereal, mini pretzel twists, Cap’n Crunch cereal, and Honey Nut Cheerios cereal. -
Step 2
Add the red, white, and blue M&M’s to the cereal mixture. -
Step 3
In a microwave-safe bowl, melt the white chocolate chips with the coconut oil. Microwave in 30-second intervals, stirring after each, until smooth and melted. -
Step 4
Pour the melted white chocolate over the cereal and pretzel mixture. Gently stir until everything is evenly coated. -
Step 5
If using, sprinkle the festive sprinkles over the mixture immediately after coating. -
Step 6
Spread the snack mix onto a large baking sheet lined with parchment paper to allow it to cool and harden completely. This will take about 10-15 minutes. -
Step 7
Once hardened, break apart any large clumps and serve or store in an airtight container.
Important Information
Nutrition Facts (Per Serving)
It is important to consider this information as approximate and not to use it as definitive health advice.
Allergy Information
Please check ingredients for potential allergens and consult a health professional if in doubt.