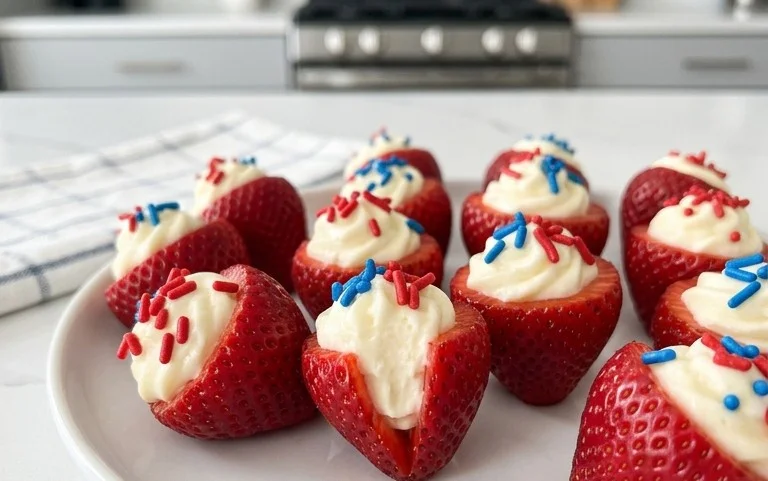
Red White Blue Cheesecake Strawberries-Easy Dessert
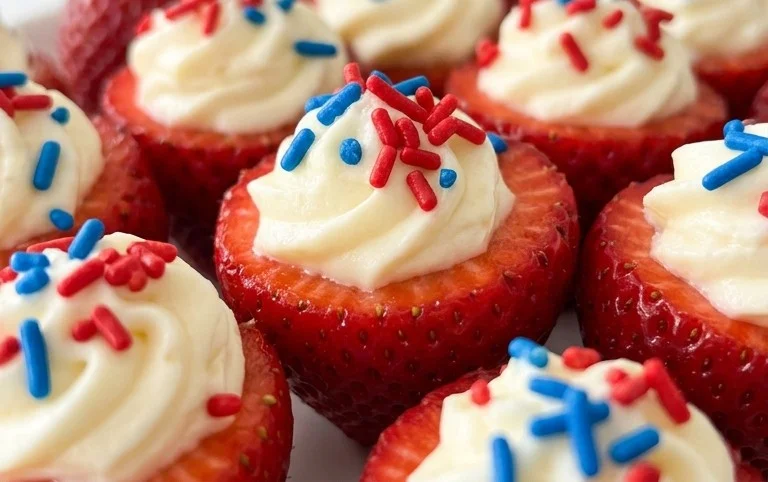
Red, White, and Blue Cheesecake Strawberries are more than just a dessert; they’re a celebration on a plate! Imagin extracte plump, juicy strawberries transformed into bite-sized masterpieces, bursting with creamy cheesecake filling and a hint of patriotic flair. These delightful treats are a guaranteed crowd-pleaser, perfect for everything from backyard barbecues and Fourth of July parties to simple, sweet moments with loved ones. What makes Red, White, and Blue Cheesecake Strawberries so irresistible? It’s the perfect marriage of textures and flavors: the slight tang of fresh strawberries, the rich, decadent smoothness of no-bake cheesecake, and that visual pop of red, white, and blue that instantly evokes summer fun and festive occasions. They’re surprisingly easy to make, offering a sophisticated dessert without the fuss, and I can’t wait to share my simple yet spectacular recipe with you.
Get ready to wow your guests!
Let’s dive into this vibrant treat.
Red, White, and Blue Cheesecake Strawberries
These Red, White, and Blue Cheesecake Strawberries are the perfect patriotic dessert that’s as delightful to look at as it is to eat. Imagin extracte the vibrant colors of the American flag in a bite-sized explosion of creamy, sweet, and fruity goodness. This recipe is wonderfully simple to put together, making it ideal for last-minute gatherings or a fun baking project with the kids. The combination of tangy cream cheese filling, airy whipped topping, and the freshness of strawberries and blueberries is truly irresistible. Forget complicated baking; this no-bake treat delivers big on flavor and festive flair.
Ingredients:
Making the Creamy Filling
The heart of our Red, White, and Blue Cheesecake Strawberries is the luscious, no-bake cheesecake filling. It’s incredibly easy to whip up and provides that signature creamy texture without any of the fuss of traditional cheesecake baking.
1. Begin extract by ensuring your 8-ounce package of cream cheese is properly softened. This is crucial for achieving a smooth and lump-free filling. You can leave it on the counter for about an hour, or if you’re in a hurry, you can gently microwave it in short, 15-second bursts, being careful not to melt it. In a medium mixing bowl, add the softened cream cheese. Using an electric mixer (or a whisk and a lot of elbow grease), beat the cream cheese until it’s completely smooth and creamy. You want it to be light and airy, with no visible lumps. This is the foundation of our delicious filling.
2. Next, it’s time to sweeten things up! Gradually add the 1/2 cup of confectioners’ sugar to the cream cheese mixture. Beat them together until the sugar is fully incorporated and the mixture is smooth and well combined. Confectioners’ sugar, also known as powdered sugar, dissolves easily and adds a delicate sweetness without making the filling grainy. Continue to beat for another minute or so to ensure maximum smoothness. This step builds the sweet, classic cheesecake flavor we’re aiming for.
3. Now, for that incredible lightness and airy texture, we’ll incorporate the whipped topping. Gently fold in the 1 cup of thawed whipped topping into the cream cheese and sugar mixture. It’s important to fold rather than beat vigorously at this stage. Use a spatula and move it in a gentle, scooping motion from the bottom of the bowl up and over. This preserves the airiness of the whipped topping, which is what gives our filling its cloud-like consistency. Continue folding until just combined; overmixing can deflate the whipped topping and result in a denser filling.
4. To add a hint of sophisticated flavor that complements both the berries and the creamy filling, stir in the 1/2 teaspoon of almond extract. Almond extract has a lovely, slightly floral and nutty aroma and taste that pairs beautifully with fruit and dairy. Give it a final gentle stir to distribute the flavor evenly throughout the filling. Taste a tiny bit at this point (with a clean spoon, of course!) to ensure you’re happy with the sweetness and flavor balance. You can adjust by adding a pinch more confectioners’ sugar if you prefer it sweeter, or a tiny drop more almond extract if you love that nutty note.
Assembling the Patriotic Masterpieces
With our creamy filling ready, it’s time to bring together the vibrant red, white, and blue elements. This is where the magic happens, transforming simple ingredients into a showstopper dessert.
5. Prepare your strawberries. Gently wash and hull the 12 large strawberries. Then, carefully cut each strawberry in half lengthwise. You should have 24 strawberry halves. These will form the “red” base for our mini cheesecakes. For the “white” part, we’ll use the creamy filling. Using a spoon or a small piping bag fitted with a star tip (if you want extra flair, though a spoon works perfectly!), carefully spoon or pipe a generous dollop of the cheesecake filling onto the cut side of each strawberry half. Aim for a mound that resembles a dollop of whipped cream. Don’t worry if it’s not perfectly smooth; a rustic look is charming too!
6. Now for the “blue”! Take your 36 blueberries and artfully arrange them on top of the cheesecake filling on each strawberry half. You can place one blueberry, or three to really emphasize the red, white, and blue theme. Think of it like decorating a tiny, edible flag. Place the assembled strawberries on a serving platter or a baking sheet lined with parchment paper if you need to chill them before serving. The contrast of the deep blue blueberries against the white filling and red strawberry is visually stunning and truly captures the spirit of the holiday. For the best results and a firmer filling, it’s a good idea to chill these in the refrigerator for at least 30 minutes before serving. This allows the filling to set up nicely.
These Red, White, and Blue Cheesecake Strawberries are a delightful and effortless way to celebrate any occasion, especially patriotic holidays like the Fourth of July. They’re refreshing, flavorful, and guaranteed to be a hit with everyone who tries them. Enjoy!
Conclusion:
There you have it – a delightful recipe for Red, White, and Blue Cheesecake Strawberries that’s sure to impress! This recipe is truly fantastic because it combines the natural sweetness of fresh strawberries with a creamy, luscious cheesecake filling, all presented in a visually stunning patriotic theme. It’s the perfect dessert for picnics, barbecues, or any celebration where you want a burst of flavor and color. I love how simple it is to assemble, making it an accessible treat for bakers of all skill levels.
These vibrant cheesecake-stuffed strawberries are incredibly versatile. Serve them chilled as a refreshing dessert or a sweet afternoon snack. They’re also an absolutely charming addition to any dessert platter. For variations, feel free to experiment with different flavored cheesecakes, like a lemon-infused filling for an extra zing, or even a chocolate cheesecake for a richer taste. You can also drizzle them with white chocolate or a berry coulis for added flair. I wholeheartedly encourage you to give this recipe a try; I know you’ll adore the results just as much as I do!
Frequently Asked Questions:
Can I make these Red, White, and Blue Cheesecake Strawberries ahead of time?
Yes, you absolutely can! I recommend making the cheesecake filling and hulling the strawberries a day in advance. You can then fill the strawberries a few hours before serving. This allows the flavors to meld and ensures they remain fresh and delicious. Just keep them refrigerated until you’re ready to enjoy them.
What’s the best way to store any leftover cheesecake strawberries?
Store any leftover Red, White, and Blue Cheesecake Strawberries in an airtight container in the refrigerator. They are best enjoyed within 2-3 days for optimal texture and flavor. The strawberries will become softer over time, so if you have a lot, it’s a good idea to enjoy them sooner rather than later.
Are there any tips for getting the perfect cheesecake filling consistency?
The key to a perfect cheesecake filling is to ensure your cream cheese and any other dairy components (like sour cream or heavy cream) are at room temperature. This prevents lumps and creates a smooth, velvety texture. Also, be careful not to overmix once the dry ingredients are added, as this can lead to a less-than-ideal consistency.
Red, White, and Blue Cheesecake Strawberries
A festive and easy no-bake dessert featuring cream cheese filling in strawberry halves, topped with blueberries.
Ingredients
-
1 (8-ounce) package cream cheese, softened
-
1/2 cup confectioners’ sugar
-
1 cup whipped topping, thawed
-
1/2 teaspoon almond extract
-
12 large strawberries, cut in half
-
36 blueberries
Instructions
-
Step 1
In a medium bowl, beat the softened cream cheese and confectioners’ sugar until smooth. -
Step 2
Gently fold in the thawed whipped topping and almond extract until well combined. -
Step 3
Spoon or pipe the cream cheese mixture into the hollowed-out halves of the strawberries. -
Step 4
Arrange the filled strawberry halves on a serving platter. -
Step 5
Top each filled strawberry with blueberries. -
Step 6
Chill for at least 15 minutes before serving.
Important Information
Nutrition Facts (Per Serving)
It is important to consider this information as approximate and not to use it as definitive health advice.
Allergy Information
Please check ingredients for potential allergens and consult a health professional if in doubt.